-
NIU Scooter Extra Range and Performance Dual Battery Accessory
- €74.95
- Select options This product has multiple variants. The options may be chosen on the product page
How to Connect a Second Battery for Your NIU NQI Sport / N1S Scooter
How to Connect Two Batteries on NIU N1S Scooters for Extra Range and Power
In this guide, I’ll explain to you how to connect two batteries for your NIU-N1S or NQi Sport scooter using our dual battery accessory. The original scooter only allows for one battery, but the design of the scooter allows you to easily store a second battery in the scooter, and due to the use of our dual battery accessory, you can use both of the batteries simultaneously, and you can also charge both batteries simultaneously. Another benefit of running this dual battery build is that you can increase the power of your scooter as you now have double the performance.
Benefits of running a dual battery setup
- If paired with our controllers you can increase the performance of your scooter as you now have the capacity of two batteries allowing you to increase acceleration and top speed. If you do not have our motherboards it will only increase the range without any performance speed up.
- Use both batteries simultaneously allows for increasing range by x2
- Ability to charge both batteries through the scooter port.
- The diode will regulates differences in battery level between the two batteries meaning that if one battery were to be lower than the diode will use them accordingly. (Same if one battery has a larger ampere capacity than the other)
- Prevent you from having to swap batteries
What is the purpose of the diode?
- Without the diode if there are any differences in battery level because one battery isn’t charged properly or whether the battery life of the batteries are not the same the diode will help regulate these differences.
- If one were to use two batteries without the diode it would result in the error of that the scooter is charging because the circuit is not parallel, battery A will start charging battery B resulting in a charging error.
Instructions for Installing the Dual Battery Accessory on Your Scooter
Step 1: Remove the Scooter Trunk
– Open your scooter trunk.
– Remove the 4 screws securing the trunk to the scooter.
– Take the trunk out of the scooter.
Step 2: Loosen Cables on the Scooter Controller
– Locate the black and red cables on your scooter controller.
– Loosen these 2 cables.
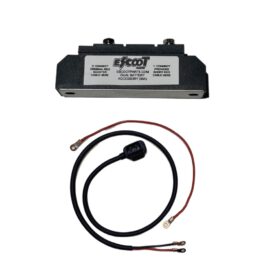
Step 3: Connect the Original Red Cable onto the Diode
– Take the new dual battery accessory.
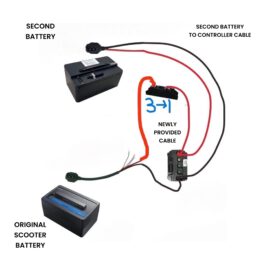
– Connect the red cable from the original scooter controller to the side labeled “3” on the new accessory.
Step 4: Connect the Short Cable to the Accessory
– Take the short cable provided with the accessory.
– Connect this cable to the side labeled “1” on the new accessory.
Step 5: Secure the Short Red Cable onto the Scooter Controller
– On the other end of the newly provided short cable, connect it to the red side of the scooter controller.
Step 6: Finalize the Installation
– Take the newly provided battery plug head.
– Connect this plug head to the black and red sides of your scooter controller.
– This plug head can be connected to your new second battery.
Caution:
- When using both batteries try to avoid large differences in battery level.
- It is recommended not to use only one battery after installing the accessory as this might damage the motherboard.